Argus Kitchen Remodel

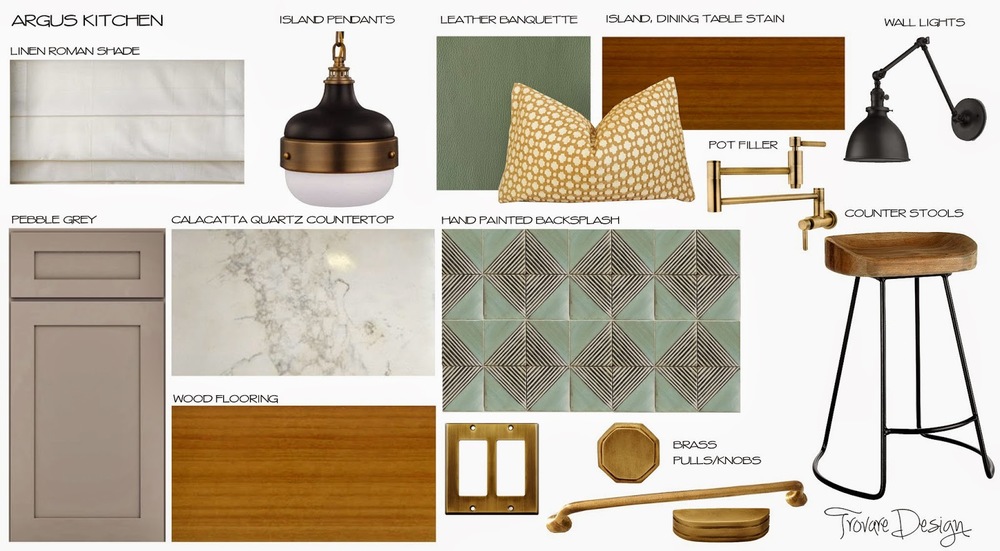
I am elated to be working with the coolest clients on their kitchen and laundry room remodel in Eaglerock. We are gutting the space, knocking out walls, reworking doorways, tearing up the floor and relocating major components for optimal flow and function. The highlights include new built-in window seating, a working island and a space plan that draws the eyes to the backyard and frames the bay window as the focal point.  The design concept combines the warmth and artistry of a Craftsman, with

clean modern lines

and a dash of mid-century. This active family will have 3x more storage and a cozy sun filled space they will never want to leave (unless they sell the house later for a

mean

profit). 

This kitchen and I could live happily ever after, if I wasn't already happily married, and if marrying kitchens were legal. Instead, I'll settle by naming my first born Argus, that will be sufficient.

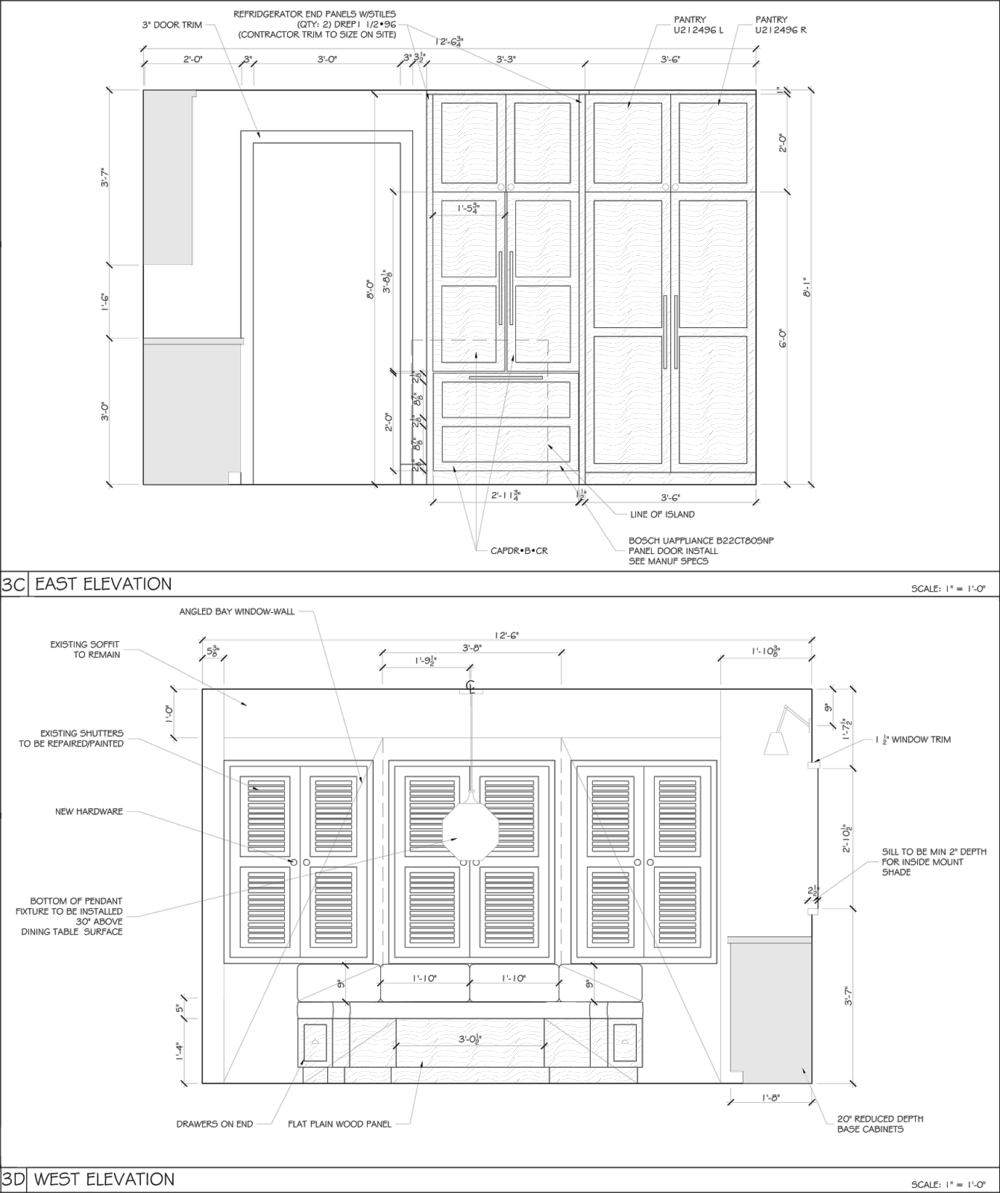
Here are the initial vibe board and drawings...

Photobucket

master's thesis

The final Thesis as required by Cal State Poly Pomona’s Master of Interior Architecture department, is a grueling 2-part project that involves a sacrificial spring lamb, or a young wild goat of your choice. Oh wait, that’s the Old Testament. But I guarantee you’ll be sacrificing something, like your soul, for the most unforgiving 6 months of your life.

After 600 hours of blood sweat & tears, I finally presented the hypothetical project to a board of architects and my highly competitive peers. It was like the Hunger Games for designers, but without the teenage love triangle. I stood there, sweating through my silk blouse like some sort of farm animal. 

The outcome? Let’s just say I gave the professor a crotch chop with a “booyah” on my way out. Now I’m going to dangle this project out on the inter-webs like bait. 

Commune LA

Commune LA is a multi-use commercial compound that embraces a local approach to products, services and design. Everything from the design concept down to the cocktail menu is rooted in local based resources and inspired by the Los Angeles entrepreneurial spirit.  

The appeal of Commune LA is anchored by the farm-to-table restaurant located on the ground level. The compound is supplemented with a one of a kind shopping experience where start up manufacturers and artisans are able to afford their own individual retail environments. Essentially they support one another by collectively sharing communal space, customers and resources.  The property also features a backyard green space for community-focused events, making Commune LA a platform for being socially beneficial. 

The design of the space has an industrial and masculine vibe, which is representative of the garment factories that came to Los Angeles during the early part of the 20th century.  The objective of Commune LA is to collaborate with local professionals in an effort to raise awareness of the relationship between consumer and product and to support the diversity of the Los Angeles community.

Commune LA - Renderings  (for a higher resolution, click "download") 

Commune LA - Construction Docs (for a higher resolution, click "download")

where oatmeal goes to DIE

Ok, I am not in a pyramid marketing scheme convincing you to buy 6 ketchups from my stockpile but I am kinda planning for the Apocalypse. You are going to need to ration your mango chutney when you begin hiding in the shadows from flesh eating zombies, and the word 'Trader Joes' is just a vague memory from a world you once knew.
So I'm gonna pimp my pantry and stay organized, so actually take inventory of my nut varieties.

Why should your food storage be a dark closet where quick cooking oatmeal goes to die? 

I have a laundry/utility room off my kitchen with a 12” deep wall niche. I’ve been staring at those 12” since 2008, fantasizing about the weekend I would DIY the shiz out of this niche with floating shelves. Well that day arrived and since Smooch and I are DIY rookies, we enlisted my dad, Old Stash.  Our shelves are 56” Long x 12” Deep, so the quantity of screws and materials depends on the size of your shelf.

MATERIAL LIST:

  • ¾” Plywood Sheets cut to the size of your niche
  • ¼” Wood Sheets, can be veneer, mdf or whatever is cheap because it’s going on the underside of the shelf and just needs to be paintable wood. Cut to the size of the niche.
  • ¾” square solid wood moldings (these will act as the ‘invisible’ brackets that will hold the weight of your shelf, they will be referred to as our “ledgers”)
  • 7 x 3” screws per shelf
  • 12 x 1 ½” screws per shelf
  • 20 x 3/8” screws per shelf
  • Dap’s Crack Shot – High Performance Spackling Paste
  • Varathane’s Polyurethane Gloss
  • Dap’s Paintable Wood Caulking
  • Sandpaper
  • 80 Grit to smooth down the spackle chunks
  • 220 Grit to prepare for painting and sand in between coats of polyurethane lacquer
  • 400 Grit to finish off the fascia, post painting
  • Stud finder
  • Level (Old Stash’s laser level was a great help)

1. MEASURE AND MARK YOUR WALL - First you’ll need to decide the spacing between your shelves; this will come down to personal preference. I made ours 15” high which is the max you should go, I did this to give our shelves a nice roomy and open-feeling. I also left our top shelf at 18” high, to allow for even taller items like vases or equipment like blenders, etc.

Your shelf will be 1 ¾” in height, and your ledgers will need to be attached to the wall ¾” below where you want the top of your shelf to sit.

Begin from your bottom shelf and work up, measuring the height for your preferred spacing of each shelf. Using a level and stud finder, basically draw your shelves along the wall with a pencil. After finding the studs, mark your screw holes for each shelf.

2. ATTACH LEDGERS - Cut the ¾” ledgers to size and pre-drill them to make sure the 3”screws don’t split the wood. Using the 3” screws, attach the ledgers to the wall based on your penciled markings . Since these will hold the weight of your shelves, when possible, these screws should be drilled directly into the studs. (If studs cannot be found, the use of drywall anchors is highly suggested.)

3. INSTALL THE SHELF - First secure the remaining wood ledger to the front of your plywood shelf. Make sure it’s as flush as possible; this will be the face of your shelf. Place the shelf on top of your wall bracket. Using the 1 ½” screws, attach the shelf to the ledgers.  For a smoother finish, you can counter sink the flat-head screws into the top of your shelf. For our shelf size, we used 4 screws along the back and front, and 2 on the sides.

4. ATTACH THE SHELF BASE - Old Stash attached the ¼” mdf sheet to the underside, by drilling 3/8” screws approximately 5” – 8” apart. Use a clamp or two to hold the sheet in place while drilling.

5. PREP FOR PAINTING - After some trial and error, we found that wood filler is dry and crumbly. Since we are painting (not staining) we used a heavy duty spackle to fill the screw holes, to fill any large gaps along the walls that were too wide for caulk, and to create a smooth front fascia.

Layering the spackle on the front of your shelves will take a number of repetitions. Spackle – let dry – sand. Tutorials I found say you only need to do this 2-3 times, but since we are amateurs, we did this 5-6 times. Continue this process until you are satisfied with the smoothness of your shelf face. Lastly, using the caulk, fill in the edges along the back and sides of each shelf, smooth away excess by wiping with your finger. Yes, I said wipe with your finger.

6. PAINTING AND FINISHING - Now prime and paint the wall and your shelves. I always use minimum 3 coats of paint to get the depth I want. I applied 4 coats of polyurethane gloss finish, with a minimum of 2 hours dry time, between coats. I did 2 coats Saturday and 2 coats Sunday. This is why it literally takes an entire weekend or two or three, depending on your patience.

7. A NOTE ON YOUR BOTTOM SHELF – This will be a bit different for everyone. We were able to rest our bottom shelf directly onto the base molding, and used scrap plywood as a toe-kick to hold up the front of the shelf. Smooch artfully filled the corners and gaps with spackle. After sanding and painting it turned out great. BUT, for your bottom shelf, you may need to use the ledgers as above.

Remember to save the scrap plywood for your toe-kick. Find containers that you like, make sure they fit the depth of your shelves.  Acrylic Airtight Jars  Striped Baskets

Happy Election Day!

Get your Red, White and Blue On!  ...or Paprika, Bone, Indigo.

This contrasting color combo is so joyous, even in ethnic style it evokes that high spirited dramatic effect. If I can figure out how to remove this gel manicure, it will be the best Tuesday ever! On the political front, I've got love for both sides of the marble aisle; I prefer blue & red working together in harmony, just see how gorge it looks!

Apple, Rugs & Gin

I am happy to report that NYC is alive and BOOMing. I wish the big apple would pass the economic gravy over to LA because we need it badly. I spent 3 days in the most liberating city ever. Sure, Culver City in nice n' all with our noteworthy Farmer's Market, decent co-ed Softball League and raw food cafes. However, it's hard to compare when you're soaking in the killer view from the High Line, shopping in Soho, doing Brunch at the Boathouse and dinner at The Breslin. I never miss a visit to ABC Carpet & Home, no matter what degree of my hangover or jet-laggedness. ABC has gorgeous gifts and furniture, but their niche of course, are the incredible carpets.

This is how I feel when in NY, "my heart beating like a hammer":

Patricia Urquiola - Modern Maven

I LOVE blogging because there's no fear in mispronouncing last names...  so here goes my ode to Patricia Urquiola. Her retro style furniture is weightless, and her candy color palette is just yummy & artful. She re-birthed the wooden spindle; what used to be old n' granny has been made fresh again. Urquiola also designed the W Hotel in Vieques Island. She's a fem force to be reckoned with. 

Photobucket